Warning: fopen(/home/virtual/kwjs/journal/upload/ip_log/ip_log_2024-12.txt): failed to open stream: Permission denied in /home/virtual/lib/view_data.php on line 100 Warning: fwrite() expects parameter 1 to be resource, boolean given in /home/virtual/lib/view_data.php on line 101 Influence of the Welding Speeds and Changing the Tool Pin Profiles on the Friction Stir Welded AA5083-O Joints

J Weld Join > Volume 35(3); 2017 > Article
El-Sayed, Shash, and Rabou: Influence of the Welding Speeds and Changing the Tool Pin Profiles on the Friction Stir Welded AA5083-O Joints

Abstract

In the present study, AA 5083-O plates are joined by friction stir welding technique. A universal milling machine was used to perform the welding process of the work-pieces which were fixed on the proper position by a vice. The joints were friction stir welded by two tools with different pin profiles; cylindrical threaded pin and tapered smooth one at different rotational speed values; 400 rpm and 630 rpm, and different welding speed values; 100 mm/min and 160 mm/min. During FSW of each joint, the temperature was measured by infra-red thermal image camera. The welded joints were inspected by visually as well as by the macro- and microstructure evolutions. Furthermore, the joints were tested for measuring the hardness and the tensile strength to study the effect of changing the FSW parameters on the mechanical properties. The results show that increasing the rotational speed results in increasing the peak temperature, while increasing the welding speed results in decreasing the peak temperature for the same tool pin profile. Defect free welds were obtained at lower rotational speed by the threaded tool profile. Moreover, the threaded tool pin profile gives superior mechanical properties at lower rotational speed.

1. Introduction

Friction Stir Welding (FSW) was invented by Wayne Thomas at TWI (The Welding Institute) in the UK in 19911). FSW is a relatively new technique by which similar and dissimilar materials can be joined in the solid state. The process consists of a rotating tool which is plunged into two or three sheets tightly abutted along a line and a continuous welded joint is produced by linear motion along the joint line2). FSW can be used for joining many types of materials and material combinations: aluminum and its alloys, copper and its alloys, lead-magnesium alloys, titanium and its alloys, mild steel, and metal matrix composites3). It can be used for welding 2xxx and 7xxx aluminum alloys because there are neither melting nor shield gas used in this process. Friction stir welded joints have superior mechanical and metallurgical properties4). Quite recently, considerable attention has been paid to FSW process as it has been widely used in several applications such as: aerospace, shipbuilding and automotive industries5). Tool design, rotational speed, welding speed, plunge depth, tool tilt angle and axial force are the important parameters which influence FSW process. Tool design affects the flow and the power required for the process, rotational speed affects the frictional heat, welding speed controls the generated heat, plunge depth produces sound welds, tool tilt angle affects the efficiency of the weld and axial force generates further heating4,6). The microstructure evolutions of friction stir welded aluminum joints were classified by Threadgill7). But this classification cannot be generalized for all materials because there is a difference in behavior between aluminum alloys and other materials8). The aluminum friction stir welded joint is divided into four zones: unaffected zone, heat affected zone (HAZ), thermo mechanically affected zone (TMAZ) and dynamically recrystallized zone (DXZ)8). El_Sayed et al9) had developed finite element model to predict the peak temperature generated during FSW process. They also studied the effect of FSW parameters of the peak temperature and the mechanical properties of AA5083-O friction stir welded. Jesus et al10) had investigated the effect of geometrical parameters on AA5083-H111 friction stir welded T-Joints. Rao et al11) had demonstrated the influence of tool pin profile on the microstructural properties and the corrosion behavior of AA2019 friction stir weld nuggets. Therefore, the main idea of this research work is to study the influence of the welding speeds and changing the tool pin profiles on the friction stir welded aluminum alloys joints.

2. Experimental Investigations

2.1 Welding process and operation conditions

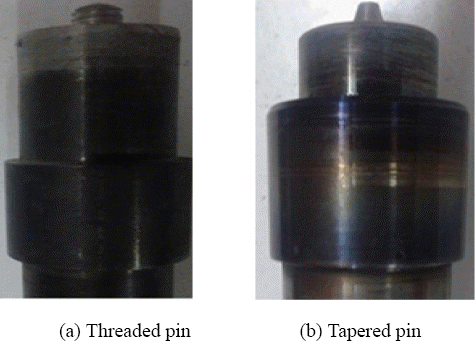
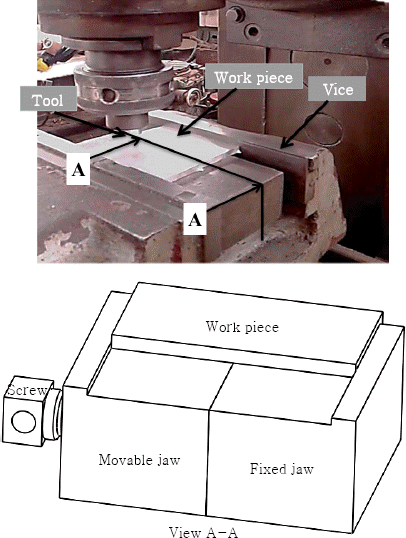
Fig. 1 shows the geometries of two FSW tools which were used in the present study. These tools were fabricated from K720 tool steel according to the required dimensions illustrated in Table 1 and heat treated to achieve the required hardness value 57 HRC. The work piece material is AA5083-O with dimensions of 100× 50×6 mm which is the half of the welded joint. The chemical composition and the mechanical properties of AA5083-O are shown in Tables 2 and 3 respectively. A universal milling machine was used to perform FSW process and a mechanical vice was used to fix the work-pieces in the proper position as shown in Fig. 2 with the schematic view A-A which illustrates the fixing of the plates at the other ends. The various operation conditions of FSW process are summarized in Table 4. The temperature was measured during each operation condition by using the infra-red thermal image camera.
Fig. 1
Tools geometries
jwj-35-3-44f1.gif
Table 1
Tools geometries specification
Specification Threaded tool pin Tapered tool pin
Shoulder diameter mm 25 25
Pin Specifications Cylindrical Threaded pin M8 x5.7mm height Tapered smooth pin top diameter =8mm bottom diameter =4mm x5.7mm height
Table 2
The chemical composition of AA5083-O
Si Fe Cu Mn Mg Zn Ni Pb Sn Al
0.1737 0.2867 <0.0010 0.4623 4.298 0.0075 <0.005 <0.002 <0.002 Balance
Table 3
The mechanical properties of AA5083-O
Ultimate tensile strength (σu) [MPa] Yield strength (σy) [MPa] Elongation (%) Brinell Hardness (HB)
275 176 14 75
Fig. 2
Machine set-up
jwj-35-3-44f2.gif
Table 4
Machine operation conditions
Process parameters Tool pin profile Welding speed (mm/min) Rotational speed (rpm) Tool tilt angle (°)
Value Cylindrical Threaded and Tapered smooth 100 and 160 400 and 630 0

2.2 Material characterization

A rectangular specimen was cut out from each friction stir welded joint perpendicular to the welding line. The samples were ground using emery papers down to 2500 grade followed by polishing using 0.3 μm alumina suspension solutions. The surfaces of the specimens were etched using Poulton′s reagent [2ml HF, 3ml HCl, 20ml HNO3, 175ml H2O] for examination of both macro- and microstructure evolutions. The microstructure examination was carried out using an OLYMPUS optical metallurgical microscope, equipped with a high resolution digital camera for the investigation of the microstructure.

2.3 Mechanical properties

The mechanical properties (mainly hardness and tensile strength) were measured for each sample.

2.3.1 Microhardness test

A rectangular specimen was cut out from each friction stir welded joint perpendicular to the welding line and prepared for the microhardness test. Hardness measurements were carried out along the line at the mid-thickness position of the cross section which is normal to the welding line under 10 Kgf load.

2.3.2 Tensile strength

Tension test samples were cut out from each friction stir welded joint and then machined according to ASTM E8M-04 standard dimensions as shown in Fig. 3. The tests were performed on computerized universal testing machine and then the tensile strength average value of three specimens was calculated for each welded joint.
Fig. 3
Schematic drawing of tension test specimen (Thickness = 6 mm)
jwj-35-3-44f3.jpg

3. Results and Discussions

3.1 Effect of FSW parameters on the peak temperature of the welded joints

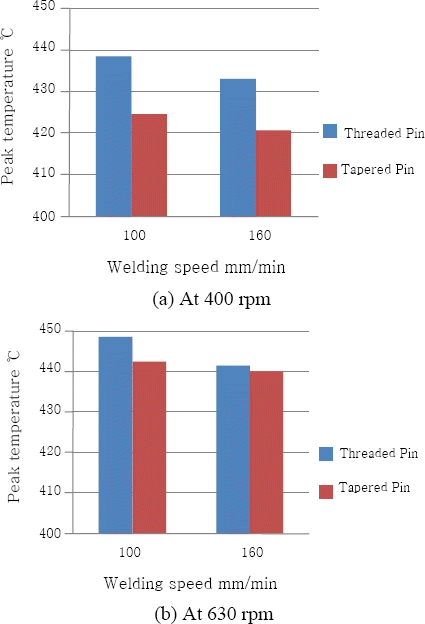
Fig. 4 shows the peak temperature variation due to the variation of FSW parameters. As observed from both Figs. 4.a and b, the welding peak temperature decreases with increasing the welding speed for the same tool and rotational speed, while it increases with increasing the rotational speed for the same tool and welding speed. It is worth nothing that the peak temperatures obtained by the threaded tool are higher than those obtained by the tapered one at the same rotational and welding speed values due to higher stirring action and higher frictional heat resulted from higher contact area in the case of the threaded pin.
Fig. 4
Variation of peak temperature due to variation of FSW parameters
jwj-35-3-44f4.gif

3.2 Surface morphology

The upper surfaces macrographs of the welded joints by the threaded tool pin profile at different rotational and welding speeds are shown in Fig. 5. As can be seen from the figure, at lower rotational speed (i.e. 400) the welded joints have an acceptable surface appearance at both welding speed values where there are no grooves or surface-open tunnel defects, while at higher rotational speed (i.e. 630 rpm) surface-open tunnel defect appeared at lower welding speed (i.e.100 mm/min) only. On the other hand Fig. 6 shows the upper surface macrographs of the welded joints by the tapered tool pin profile. It is clear that at lower rotational speed the surfaces appearances are accepted at both welding speed values, while at higher rotational speed, surface- open tunnel defect has been detected at both welding speed values.
Fig. 5
Surface appearance of the welded joints by the threaded tool pin profile at different rotational and welding speeds
jwj-35-3-44f5.gif
Fig. 6
Surface appearance of the welded joints by the tapered tool pin profile at different rotational and welding speeds
jwj-35-3-44f6.gif

3.3 Macro-and microstructure evolutions

Fig. 7 shows the macro- and microstructure evolutions of the welded joints by the threaded tool pin profile at different rotational and welding speed values. As can be seen from the figure at lower rotational speed (i.e. 400 rpm) and both welding speed values, defect-free welds are obtained with onion rings in the nugget zone, while at higher rotational speed (i.e. 630 rpm) and both welding speed values, tunnel defects appeared. On the other hand in the case of the tapered tool pin profile shown in Fig. 8, tunnel defects appeared at all welding conditions. It is noticeable that the tunnel defect size increases with increasing the rotational speed for the same welding speed.
Fig. 7
Macro- and microstructure evolutions of the welded joints by threaded tool and at different rotational and welding speeds
jwj-35-3-44f7.gif
Fig. 8
Macro- and microstructure evolutions of the welded joints by tapered tool and at different rotational and welding speeds
jwj-35-3-44f8.gif

3.4 Effect of FSW parameters on the Mechanical properties of the welded joints

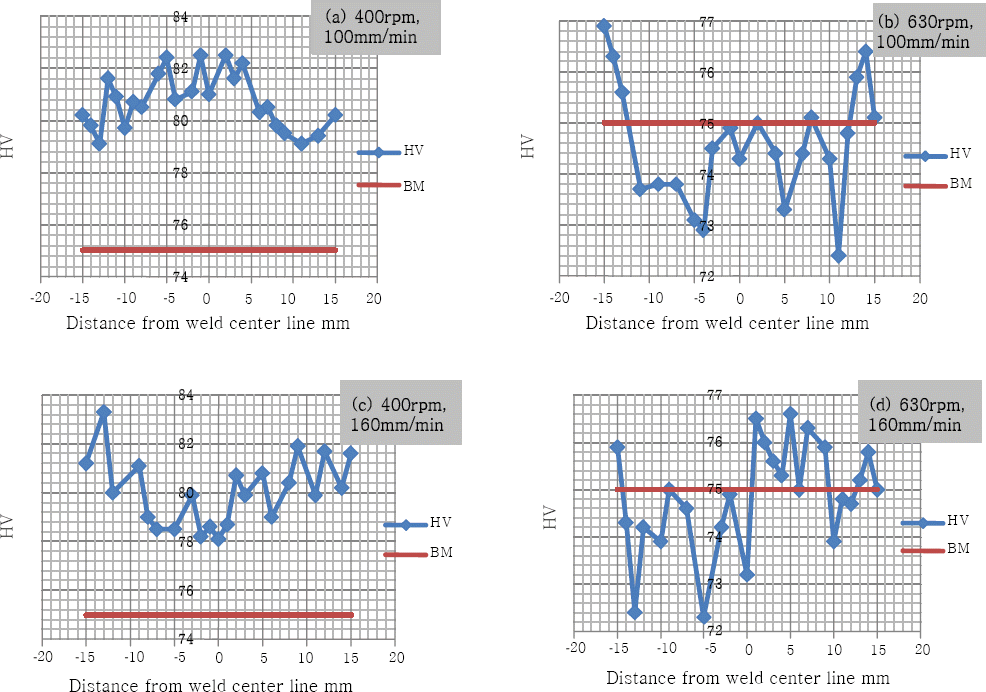
Fig. 9 represents the Vickers microhardness profile of the welded joints by the threaded tool pin profile. It is clear from Figs. 9.a and c that at 400 rpm, the hardness values in the welding zone are greater than that of the base material hardness value due to finer and equiaxed grains as reported by Threadgill et al.8). The same occurred at 630 rpm, 160 mm/min as shown in Fig. 9.d, while at 630 rpm, 100 mm/min the hardness values in the welding zone are lower than the base material due to grains coarsening and growth as shown in Fig. 9.b as mentioned by Mishra et al.4). On the other hand Fig. 10 represents the hardness profile in the case of the tapered tool pin profile. As can be observed from the figure, the hardness values in the welding zone are greater than that of the base material at 400 rpm and both welding speed values as shown in Figs. 10.a and c, while almost hardness values in the welding zone at 630 rpm are lower than the base material for both welding speed values as shown in Figs. 10.b and d. It is worth nothing that the lower hardness values resulted from bigger grains sizes due to the higher heat input and following grain growth during FSW.
Fig. 9
Vickers microhardness profile of the welded joints by threaded tool pin profile at different rotational and welding speed values
jwj-35-3-44f9.gif
Fig. 10
Vickers microhardness profile of the welded joints by tapered tool pin profile and at different rotational and welding speeds
jwj-35-3-44f10.gif
Moreover, the tensile strength values of the welded joints were obtained and plotted against the welding speed for both rotational speed values and both tool types. Fig. 11 shows the variation of the tensile strength due to the variation of FSW parameters. It is noticed that the best tensile strength value obtained by the threaded tool at 400 rpm, 100 mm/min. The results show that the rotational speed variation has a great effect on the tensile strength for both tool pin profiles. The fracture positions of all friction stir welded joints samples are presented in Figs. 12 and 13. The specimens show ductile fracture mode with shrinkage in area. The fracture positions of almost specimens is located at the retreating side and in the tunnel defect. It is worth nothing that the higher tensile strength values obtained in the case of defect-free welds and the tensile strength values is affected by the tunnel size where the bigger tunnel size results in lowering the tensile strength value.
Fig. 11
Tensile strength variation due to variation of FSW paramters
jwj-35-3-44f11.gif
Fig. 12
Fracture positions of the welded joints by threaded tool pin profile
jwj-35-3-44f12.gif
Fig. 13
Fracture position of the welded joint by tapered tool pin profile
jwj-35-3-44f13.gif

4. Conclusions

From the examinations that have been conducted, it is possible to conclude that:
1) The peak temperature during FSW process increases with increasing the rotational speed for the same tool pin profile and the welding speed, while it decreases with increasing the welding speed. Furthermore, the peak temperatures obtained by the threaded tool pin profile are higher than those obtained by the tapered one at the same rotational and welding speed values.
2) The welded joints by the threaded tool pin profile are affected by increasing the rotational speed, where at lower rotational speed the defect-free welds are obtained but at higher rotational speed, tunnel defects are detected. While all the welded joints by the tapered tool pin profile have an internal tunnel defects at all FSW conditions, where the tunnel size is affected by both rotational and welding speed values.
3) The weld zone hardness values of the welded joints by both tool pin profiles are greater than the base material hardness value at lower rotational speed and at both welding speed values.
4) The optimum tensile strength value in this work is obtained by the threaded pin at 400 rpm and 100 mm/min. Tensile strength values of the friction stir welded joints by the threaded tool pin profile decrease with increasing welding speed at both rotational speed values, while in the case of the tapered pin, the tensile strength values decrease with increasing the welding speed at 400 rpm and increase with increasing the welding speed at 630 rpm.
5) The tunnel size has a great effect on the tensile strength values where, the lowest tensile strength value obtained in the case of the biggest tunnel size.
6) The best selection of the tool is the threaded tool pin profile at lower rotational speed in terms of defect-free and tensile strength values, but the tapered tool pin profile is better than the threaded one at higher rotational speed and at higher welding speed in terms of tensile strength values only.

References

1. W. Thomas, E. Nicholas, J. Needham, J.C. Needham, M.G. Murch, P. Temple-Smith, and C.J. Dawes. EU Patent 0615480B1. (1991)
2. D. Kim, H. Badarinarayan, J. H. Kim, C. Kim, K. Okamoto, R.H. Wagoner, and K. Chung, Numerical simulation of friction stir butt welding process for AA5083-H18 sheets, European Journal of Mechanics A/Solids. 29 (2009) 204–215.
[CROSSREF] 
3. M. Perovic, D. Veljic, M. Rakin, N. Radakovic, A. Sedmak, and N. Bajic, Friction-Stir Welding Of High-Strength Aluminium Alloys And A Numerical Simulation Of The Plunge Stage, Materials and technology. 46(3) (2012) 215–221.
4. R.S. Mishra and Z.Y. Ma, Friction stir welding and processing, Materials Science and Engineering. 50 (2005) 1–78.
[CROSSREF] 
5. M. S. Rao, K. J. Prakash, and B. V. R. Kumar, A Review Of Friction Stir Welding Process And Its Variables, International Journal Of Science And Research (IJSR). 2(3) (2013) 375–379.
6. FSW-Technical-Handbook. ESAB, Welding Automation, SE-695 81 LAXÅ; Sweden:
7. P.L. Threadgill, TWI Bull. 28 (1997) 30–33.
8. P. L. Threadgill, A. J. Leonard, H. R. Shercliff, and P. J. Withers, Friction Stir Welding Of Aluminum Alloys, International Materials Reviews. 54(2) (2009) 49–93.
[CROSSREF] 
9. M.M. El_Sayed, A.Y. Shash, T.S. Mahmoud, and M. Abd Rabou. Thermal Distribution In Friction Stir Welding Of AA5083, Numerical Simulation, Experimental Verification and The Post-weld Mechanical Properties Measurements Of The Welded Joints. proceedings of the 10th international conference ACE-X; Split-Croatia: (2016)
10. J.S. Jesus, M. Gruppelaar, J.M. Costa, A. Loureiro, and J.A.M. Ferreira. Effect of Geometrical Parameters on Friction Stir Welding of AA5083-H111. XV Portuguese Conference on Fracture PCF. (2016), Arcos-Portgual.
11. V. RAO Ch, G.M. REDDY, and K.S. RAO, Influence Of Tool Pin Profile On Microstructure And Corrosion Behavior Of AA2219 Ale-Cu Alloy Friction Stir Weld Nuggets, Defense Technology. 11 (2015) 197–208.


ABOUT
BROWSE ARTICLES
ARTICLE CATEGORY 
FOR CONTRIBUTORS
Editorial Office
#304, San-Jeong Building, 23, Gukhoe-daero 66-gil, Yeongdeungpo-gu, Seoul 07237, Korea
Tel: +82-2-538-6511    Fax: +82-2-538-6510    E-mail: koweld@kwjs.or.kr                

Copyright © 2024 by The Korean Welding and Joining Society.

Developed in M2PI