Warning: fopen(/home/virtual/kwjs/journal/upload/ip_log/ip_log_2024-04.txt): failed to open stream: Permission denied in /home/virtual/lib/view_data.php on line 88 Warning: fwrite() expects parameter 1 to be resource, boolean given in /home/virtual/lib/view_data.php on line 89 Fatigue Analysis of the Effects of Incomplete Penetration Defects on Fatigue Crack Initiation Points in Butt-Welded Members

J Weld Join > Volume 38(6); 2020 > Article
Wang, Chang, and Muzaffer: Fatigue Analysis of the Effects of Incomplete Penetration Defects on Fatigue Crack Initiation Points in Butt-Welded Members

Abstract

Fatigue life evaluation of steel structures is a very important issue in their design and maintenance. For steel structure maintenance, it is particularly important to know when and where fatigue cracks are initiated in aging steel bridges. To calculate the fatigue life and identify crack initiation points in butt-welded members, a fatigue finite element method was developed in this study. First, to represent weld fatigue phenomena, this study applied the finite displacement theory and elastic-plastic cycle hysteresis constitutive model to reproduce large deformations and repeated load phenomena. Then, the damage mechanics theory was applied to reproduce fatigue cracks and assess the fatigue life. The effect of incomplete penetration defects on fatigue life and crack initiation points of butt-welded members were clarified using fatigue finite element method. Results also showed that crack initiation points and fatigue life were different depending on the depth of incomplete penetration. The FEM results were considered reliable after comparing with results from Hotspot stresses, IIW and DNV-GL.

1. Introduction

The number of aging steel structures, such as aging bridges, that must be maintained are gradually increasing. As a result, the need to perform safety inspections is also increasing. On the other hand, in carrying out safety inspections of aging bridges, many incomplete penetration defects are found in the weld joints. However, it is difficult to judge to what depth the penetration defect extends, so a fatigue assessment method is needed to evaluate whether incomplete penetration defects are safe or not. These welded butt members with incomplete penetration have weld toe and incomplete penetration depth. Also, butt welded joints have portions where stress is concentrated not only from welding but also from repeated loading. Therefore, it is difficult to ascertain the fatigue crack initiation point from experimental research. In this study, three-dimension fatigue FEM was proposed and used to determine fatigue life and crack initiation.
The theory of continuum damage mechanics is employed in fatigue FEM and cyclic hysteresis fatigue models, which are demonstrated by the cyclic hysteresis constitutive equation and continuum damage theory. Also, characteristics of several fatigue phenomena were formulated to apply fatigue FEM. The formulated typical theories are combined the isotropic hardening rule and kinematic hardening rule, ratcheting effect, and strain range effect and mean stress effect and damage theory etc35-37,46).
Among the various factors that affect fatigue life and crack initiation, this study focuses on the effect of incomplete penetration depth. It is difficult to find the fatigue crack initiation point by experiment because it is prone to various experimental errors and it is hard to know the crack initiation point in cases where it occurs internally. There are several studies related to welding defects of butt members. These studies dealt mainly with stress concentration and fatigue life by experiment12-14,31-34).

2. FE welding analysis procedure for butt-welded member

Since cracks mainly occur in the weld joints, the welded member should be reproduced. Also, residual stresses are thought to influence fatigue strength1-3). The initial residual welding stresses and welding deformations were analyzed to reproduce the initial mechanical state of the butt-welded member. The welding residual stresses and deformation values were calculated by using a 3D non-steady heat conduction FEA and a 3D thermal elastio-plastic FEA. The welding temperature history obtained by non-steady heat conduction analysis was used as initial data for the welding residual stress and welding deformation analysis. These welding analysis methods have been extensively verified4-7). The welding analysis procedure based on an in-house program consists of two steps for reproducing the butt-welded member7). In the first step, a 3D non-steady heat conduction analysis was performed to find the welding temperature hysteresis. In the second step, a 3D large deformation thermal elastic-plastic analysis was performed to obtain the welding residual stress and welding deformation.

2.1 FE welding analysis model

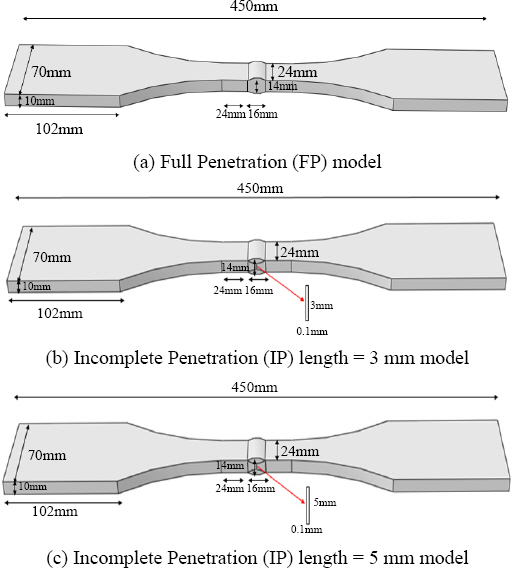
Butt-welded members were investigated to clarify the effect of incomplete penetration depth on fatigue crack initiation point and fatigue life. The dimensions and general view of the butt members are shown in Fig. 1. The case of full penetration (FP) model and incomplete penetration (IP) model had penetration depths of 3 mm and 5 mm, respectively .SM490 steels were used as the base metal in analysis. The mesh size of the butt member is shown in Fig. 2. The 3D finite element mesh type with eight-node isoparametric solid elements was used. A fine mesh was used at the weld because the cracks occur near the weld. Also, because the mesh size affects results, the spacing between fine meshes used was 2 mm, a value which is obtained empirically. A coarse mesh was used away from the weld. The properties of temperature-dependent thermo-physical such as specific heat, heat conductivity and density of the material were employed in the non-steady heat conduction analysis.
Fig. 1
General views of butt-welded joints
jwj-38-6-543-g001.jpg
Fig. 2
Mesh views and element type
jwj-38-6-543-g002.jpg

2.2 Welding temperature and thermal elastic-plastic analysis results

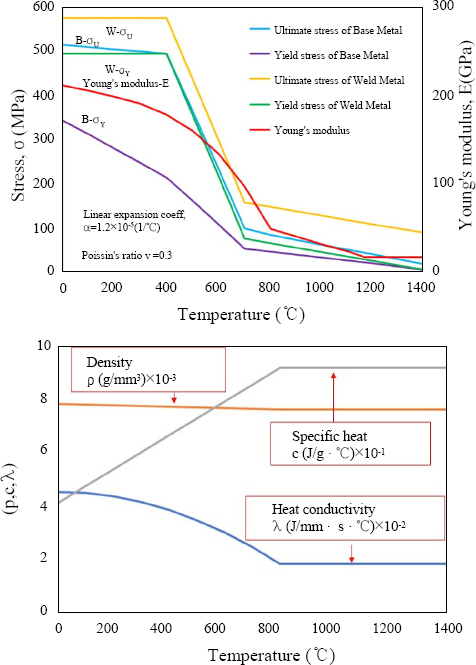
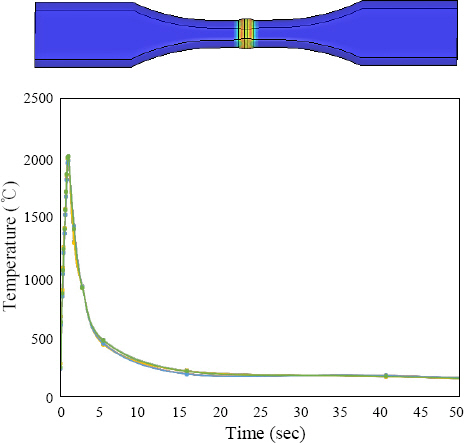
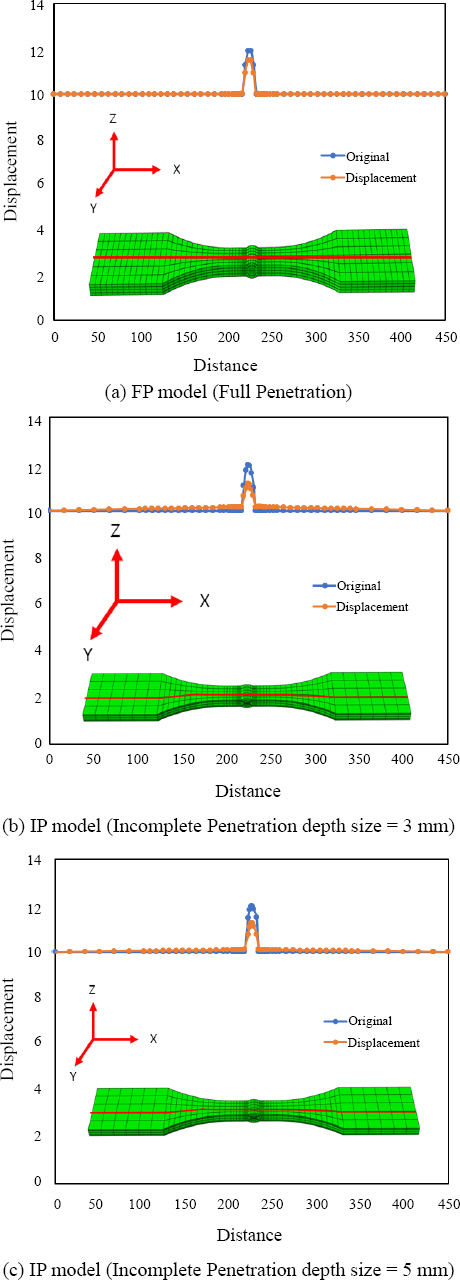
The mechanical properties and physical constants change according to the temperature change under welding. Thus, the properties of material are defined by temperature-dependent thermo-physical and mechanical properties such as yield stress, ultimate stress and Young’s modulus of the base member and weld metals. Fig. 3 shows the properties of the material. Fig. 4 shows a result of the temperature distribution calculated from the non-steady heat conduction analysis. The boundary conditions used during welding analysis is shown by Fig. 5. To find the residual stresses and welding deformations, the temperature history was introduced in the 3D thermal elasto-plastic FEA as the initial thermal load6,7). Fig. 6(a), (b), and (c) show the residual stresses of butt-welded members at the upper parts. The result of residual stresses of full penetration is shown Fig. 6(a). The results of partial penetration model are shown Figs. 6(b) and (c). The welding deformations were analyzed by using a 3D large deformation thermal elasto-plastic FEA. Fig. 7(a), (b) and (c) show a sample of welding displacements of nodal points at the upper surface. The results indicate that there was little difference in displacements as the model size was small, so in order to visualize these differences in figures we have multiplied the data by 5. The displacement in Fig. 7(a) is small compared to Fig. 7(b) and Fig. (c) as the residual stresses in full penetrated butt welded member was small compared to incomplete penetrated butt welded members (3mm and 5mm).whereas the displacement in Incomplete penetration butt welded members were same as the residual stress in z direction was almost same.
Fig. 3
Temperature-dependent mechanical material properties and physical constants
jwj-38-6-543-g003.jpg
Fig. 4
Examples of temperature distributions
jwj-38-6-543-g004.jpg
Fig. 5
Boundary conditions during welding analysis
jwj-38-6-543-g005.jpg
Fig. 6
Residual stresses distribution
jwj-38-6-543-g006.jpg
Fig. 7
Welding displacement of the nodal point on the upper surface
jwj-38-6-543-g007.jpg

3. Fatigue test for butt-welded members

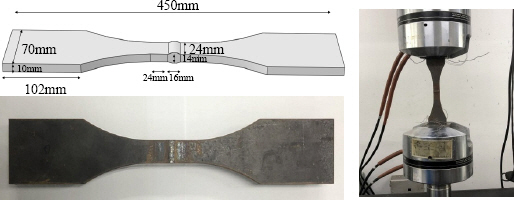
The fatigue test was performed by using an MTS809- 250KN servo-hydraulic testing machine to verify the analysis results of the fatigue FEM. A standard-size specimen was used for the fatigue experiment. The fatigue FEM analysis was performed with identically sized test specimen. The welding condition was full penetration welding. The load was applied by displacement control. The fatigue testing method for the welded specimen was carried out based on the ASTM standard. Dimensions of butt-welded specimens, geometry, and MTS machine for testing are shown in Fig. 8. The fatigue test results are shown in Fig. 11. The results of analysis and experimental are in good agreement and satisfy the S-N curves of IIW.
Fig. 8
Dimensions of butt-welded specimens, geometry, and MTS machine for testing
jwj-38-6-543-g008.jpg
Fig. 9
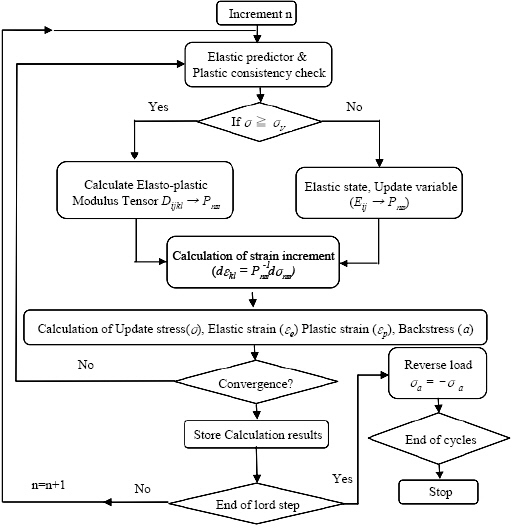
Flow chart of fatigue FEM
jwj-38-6-543-g009.jpg
Fig. 10
Load type and boundary conditions
jwj-38-6-543-g010.jpg
Fig. 11
Comparison of fatigue results
jwj-38-6-543-g011.jpg

4. Fatigue FE analysis for butt-welded members

In fatigue analysis, CDM20-27) was considered46). Fig. 9 shows the overall numerical procedures. The other formulated procedures have been extensively published in other papers35-37).

4.1 Load and boundary conditions of fatigue FEA

Fig. 10(a) shows the load type applied. A repeated load was given by the displacement control. The magnitude of varying displacement amplitude was given from 0.3 to 0.6mm. The applied load is different depending on the stress range. The minimum value is 0.0 mm. The boundary conditions are shown in Fig. 10(b). The one end of the member was fixed in the all directions. The loads were equally distributed to the other end of the member.

4.2 Effect of incomplete penetration depth on fatigue life

The effect of incomplete penetration depth on fatigue life and fatigue crack initiation was investigated. Fig. 11 shows the results of fatigue life for FP and IP model. It was found that the fatigue strength and life of incomplete penetration member is lowered than that of full penetration member. The analysis results (■■■) were compared with the results (▲) of experiment. Also, the results were compared with the results of hot spot stress method (◆◆◆) that was frequently used structural design field. Fig. 12 shows the models used for the calculation of HSS. The results of fatigue FEA with the butt member was compared with the results of the HSS method shown in Fig. 11. The HSS method with the fine mesh model from IIW was used in the calculation. Fig. 12 shows model for HSS and surface stress extrapolation at the weld toe recommended by IIW. The formula for the surface stress extrapolation is given as σhs = 1.67σ0.4t - 0.67σ1.0t . The number of cycles was obtained as follows: N = C x (1/Ks)-m x (σhs)-m , where Ks = 1.24, C = 1.1 x 10¹³ , and m = 3.51.
Fig. 12
Model for HSS and surface stress extrapolation at the weld by IIW
jwj-38-6-543-g012.jpg
There was no difference in the fatigue life regardless of whether the penetration is incomplete. As expression of fatigue life loaded by uniaxial force are used by the S-N curve from the fatigue experiment. The S-N curve is generally indicated by a relationship of the stress range and the fatigue life. Because the results of fatigue FEM analysis are in a three-dimension multiaxial stress state, the longitudinal axis of the S-N curve was expressed by applying the equivalent stress range, which can denote the multiaxial stress state in order to compare with the existing S-N curve. The fatigue life was decided by the number of cycles when the first crack occurred at model. On the other hand, in the hot-spot stress (HSS) method mainly used in the design field, the left axis is expressed as an HSS range instead of a stress range. The S-N curves of fatigue analysis were compared with the S-N curve of IIW18) and DNV10). All values of S-N curve are satisfied the S-N curves of IIW and DNV.

4.3 Effect of incomplete penetration depth on crack initiation point

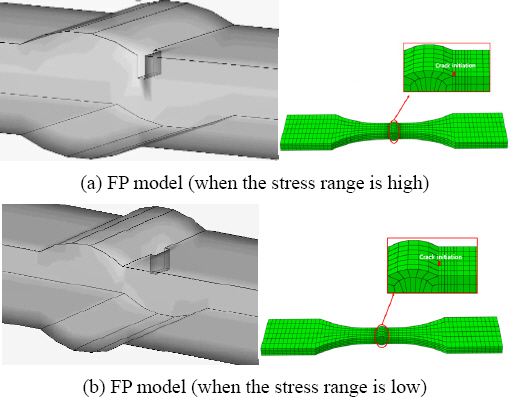
The effect of incomplete penetration depth on crack initiation point was investigated for butt members. Crack initiation point of full penetration model is shown in Fig. 13. Initial crack occurred in the end part of the weld line when the stress range is high. On the other hand, initial crack occurred at the middle part of weld line when the stress range is low.
Fig. 13
Crack initiation point of FP
jwj-38-6-543-g013.jpg
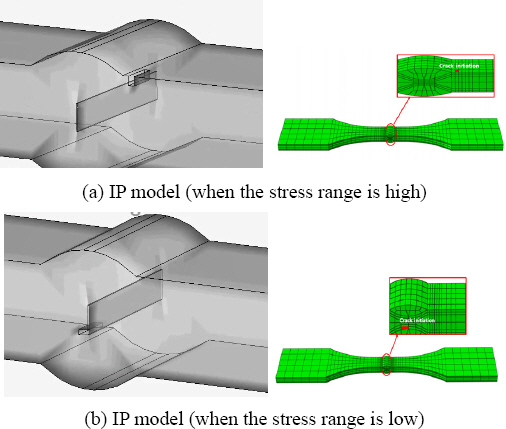
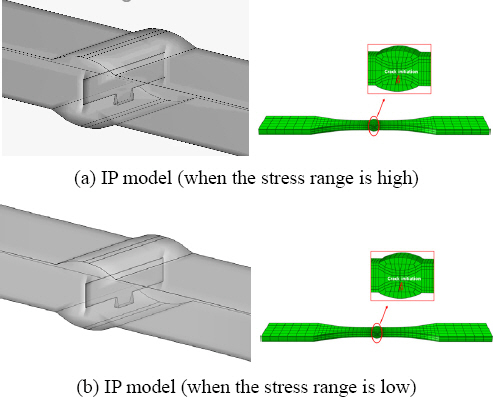
And, the effect of incomplete penetration depth was investigated, for that case the penetration depth is 3mm and 5mm, respectively. In the case of 3mm, the results are shown in the Fig. 14. Initial crack occurred in the end part of the weld line when the stress range is high. On the other hand, Initial crack occurred at the end part of the penetration depth when the stress range is low. In the case of 5mm, the results are shown in the Fig. 15. Initial crack occurred at the end part of the penetration depth regardless of stress range is high or low. As a result, it was found that incomplete penetration depth and stress range has a significant influence on the crack initiation point.
Fig. 14
Crack initiation point of IP model (Incomplete Penetration depth = 3 mm)
jwj-38-6-543-g014.jpg
Fig. 15
Crack initiation point of the IP model (Incomplete Penetration depth = 5 mm)
jwj-38-6-543-g015.jpg

5. Conclusion

The 3D fatigue analysis method was proposed based on continuum damage mechanics to investigate the effect of incomplete penetration defects on fatigue life and fatigue crack initiation point. In addition, 3D non-steady heat conduction analysis and thermal elastic-plastic analysis were performed to reproduce the initial butt-welded member. The following conclusions are summarized from this study.
  • 1) The fatigue life of butt-welded members results obtained by fatigue FEM, the HSS method, and experiments were compared.

  • 2) The fatigue life was different depending on the depth of incomplete penetration. The S-N curves of butt members with incomplete penetration obtained by using fatigue FEM satisfied the S-N curves recommended by IIW and DNV.

  • 3) Using fatigue FEM clarified the effect of incomplete penetration defects on fatigue life and crack initiation point.

  • 4) The effect of incomplete penetration defects on fatigue life and crack initiation point by using fatigue FEM was investigated for butt-welded members. It was found that the initiation point of crack was different depending on the depth of incomplete penetration.

  • 5) In the case of full penetration in the butt joint, initial cracks occurred at the end of the weld line when the stress range was high, and initial cracks occurred in the middle of the weld line when the stress range was low.

  • 6) In the case where the IP depth is 3 mm, initial cracks occurred at the end of weld line when the stress range was high, and initial cracks occurred at the penetration depth when the stress range was low.

  • 7) In the case where the IP depth is 5 mm, initial cracks occurred at the penetration depth regardless of the stress range.

  • 8) Fatigue FEM is useful for calculating fatigue life and finding the crack initiation point.

Acknowledgments

This Research was supported by Chung-Ang University research grants in 2018 and by the Basic Science Resear- ch Program through the National Research Foundation of Korea (NRF) funded by the Ministry of Education (NRF-2016R1D1A1B04930897).

References

1. Ž. žić, S. Schmauder, and H. Wolf, The effect of residual stresses on fatigue crack propagation in welded stiffened panels, Eng. Fail. Anal. 84 (2018) 346–357. https://doi.org/10.1016/j.engfailanal.2017.09.001
[CROSSREF] 
2. Ž. Božić, S. Schmauder, M. Mlikota, and M. Hummel, Multiscale fatigue crack growth modelling for welded stiffened panels, Fatigue Fract. Eng. Mater. Struct. 37(9) (2014) 1043–1054. https://doi.org/10.1111/ffe.12189
[CROSSREF] 
3. J.. Chaboche and G. Rousselier, On the plastic and viscoplastic constitutive equations-part I:rules developed with internal variable concept, J. Press. Vessel Technol. 105 (1983) 153–158. https://doi.org/10.1115/1.3264257
[CROSSREF] 
4. K. H. Chang and C. H. Lee, Characteristics of High Temperature Tensile Properties and Residual Stresses in Weldments of high Strength Steels, Mater. Trans. 47 (2006) 348–354. https://doi.org/10.2320/matertrans.47.348
[CROSSREF] 
5. K. H. Chang and G. C. Jang, A rate dependence of hysteresis model for structural steel (SM490) considering the coupled Effect of strain rate hardening and Tem- perature rise, Mater. Sci. Forum. (2008) 580–584. https://doi.org/10.4028/www.scientific.net/MSF.580-582.581
[CROSSREF] 
6. K.. Chang, H. C. Lee, K. T. Park, and T. H. Um, Experimental and numerical investigations on residual stresses in a multi-pass butt-welded high strength SM570-TMCP steel plate, Int. J. Steel Struct. 11 (2011) 315–324. https://doi.org/10.1007/s13296-011-3006-y
[CROSSREF] 
7. C.. Lee and K.. Chang, Prediction of residual stresses in welds of similar and dissimilar steel weldment, J. Mater. Sci. 42 (2007) 6607–6613. https://doi.org/10.1007/s10853-007-1528-7
[CROSSREF] 
8. C. H. Jo, S. W. Im, W. C. Cho, and K. K. Park, Fatigue crack in large-scale tubular joints for offshore structure, Sci. China Tech Sci. 54 (2011) 705–714. https://doi.org/10.1007/s11431-010-4275-y
[CROSSREF] 
9. C. Y. Kwon and J. G. Hyun, Experimental Evaluation of Fatigue Strength of the Butt Weld Joints with Incomplete Penetrations, KSCE. 19(1999) 343–350. https://doi.org/10.3221/IGF-ESIS.36.03
[CROSSREF] 
10. DNV-RP-C203, Fatigue Design of Offshore of Steel Structures, Det Norske Veritas RECOMMENDED PRACTICE, DNV-RP-C203. (APRIL., 2010)
11. L. Flaceliere, F. Morel, and A. Dragon, Coupling between mesoplasticity and damage in high cycle fatigue, Int. J. Damage Mech. 16 (2007) 473–509. https://doi.org/10.1177/1056789506067935
[CROSSREF] 
12. F. V. Lawrence and W. H. Munse, Fatigue Crack Pro- pagation in Butt Welds Containing Joint Penetration Defects, Weld. J. (1973) 221–225.
13. G. E. Nordmark, W. C. Herbein, P. B. Dickerson, and T. W. Montemarano, Effect of Weld Discontinuities on Fatigue of Aluminum Butt Joints, Weld. J. (1987) 162–173.
14. G. Meneghetti, A. Campagnolo, and F. Berto, Fatigue strength assessment of partial and full-penetration steel and aluminium butt-welded joints according to the peak stress method, Fatigue Fract. Eng. Mater. Struct. 38 (2015) 1419–1431. https://doi.org/10.1111/ffe.12342
[CROSSREF] 
15. V. Gupta, P. Bastias, G.. Hahn, and C. Rubin, Elasto- plastic Finite-element Analysis of 2-D Rolling Sliding Contact with Temperature-dependent Bearing Steel Material Properties, Wear. 169(2) (1993) 251–256. https://doi.org/10.1016/0043-1648(93)90306-7
[CROSSREF] 
16. Y. B. Guo and M. E. Barkey, Modelling of Rolling Contact Fatigue for Hard Machined Components with Process- induced Residual Stress, Int. J. Fatigue. 26(6) (2004) 605–613. https://doi.org/10.1016/j.ijfatigue.2003.10.009
[CROSSREF] 
17. D. R. Hayhurst, P. R. Dimmer, and M. W. Chernuka, Estimates of the creep rupture lifetime of structures using the finite element method, J. Mech. Phys. Solids. 23 (1975) 335–355. https://doi.org/10.1016/0022-5096(75)90032-0
[CROSSREF] 
18. XIII-1804-99 and XV-1035-99, X. L. Zhao and J. A. Packer, Fatigue Design Procedure for Welded Hollow Section Joints, International Institute of Welding. (2000)
[CROSSREF] 
19. J. H. Lee, J. S. Kim, S. U. Kang, M. Hirohata, and K.H. Chang, Fatigue Life Analysis of Steel Tube Member with T-Shaped Welded Joint by FEM, Int. J. Steel Struct. 17(2) (2017) 833–841. https://doi.org/10.1007/s13296-017-6035-3
[CROSSREF] 
20. L. M. Kachanov, Time of the Rupture Process under Creep Conditions, Izvestiia Akademii Nauk SSSR, Otdelenie Teckhnicheskikh Nauk. 8 (1958) 26–31.
21. G. Khateeb, A simple quantitative method for identification of fatigue due to fatigue damage, Int. J. Damage Mech. 20 (2011) 3–21. https://doi.org/10.1177/1056789509343084
[CROSSREF] 
22. Y. C. Kim, K. H. Chang, and K. Horikawa, Characteri- stics of out-of-plane deformation and residual stress generated by fillet welding, Trans. JWRI. 27 (1999) 69–74. https://doi.org/10.1007/BF03177399
[CROSSREF] 
23. J. Lemaitre, A continuous damage mechanics model for ductile fracture, J. Eng. Mater. Technol. 107 (1985) 83–89. https://doi.org/10.1115/1.3225775
[CROSSREF] 
24. L. W. Zarchary and C. P. Burger, Stress Concentrations in Double Welded Partial Joint Penetration Butt Welds, Weld. J. (1976) 77–82.
25. Y. M. Liu, B. Stratman, and S. Mahadevan, Fatigue Crack Initiation Life Prediction of Railroad Wheels, Int. J. Fatigue. 28 (2006) 747–756. https://doi.org/10.1016/j.ijfatigue.2005.09.007
[CROSSREF] 
26. A. Pirondi and N. Bonora, Modeling ductile damage under fully reversed cycling, Comput. Mater. Sci. 26 (2003) 129–141. https://doi.org/10.1016/S0927-0256(02)00411-1
[CROSSREF] 
27. E. Rejovitzky and E. Altus, On single damage variable models for fatigue, Int. J. Damage Mech. 22 (2013) 268–283. https://doi.org/10.1177/1056789512443902
[CROSSREF] 
28. S. O. Kim, S. I. Bae, and J. I. Song, Residual stress and displacement analysis of thick plate for partial penetration multi-pass weldment, Korean Soc. Mech. Eng. (2001) 211–216. https://doi.org/10.22634/KSME-A.2001.25.11.1813
[CROSSREF] 
29. S. H. Han, B. C. Shin, W. Lee, and J. H. Choi, Fatigue Crack Propagation Life of Partially Penetrated Butt Welds in High Strength Steel, J. Korean Weld. Join. Soc. 21 (2003) 72–79.
30. S. O. Kim, Y. L. Shim, S. I. Bae, and J. I. Song, Residual Stress and Fracture Analysis of Thick Plate for Partial Penetration Multi-pass Weldment, J. Korean Weld. Join. Soc. 19 (2001) 68–74.
[CROSSREF]  [PDF]
31. Sungho. Kim, Keunchan. Jin, Wan. Sung, and Soowoo. Nam, Effect of Lack of Penetration on the fatigue strength of high strength steel butt weld, KSME. 8 (1994) 191–197. https://doi.org/10.1007/BF02953268
[CROSSREF] 
32. S. H. Han, J. W. Han, and B. C. Shin, Estimation of Stress Intensity Factor and Prediction of Fatigue Life at Root-Tip in Partially Penetrated Butt Welds, Korean Soc. Mech. Eng. 2 (1998) 214–219.
33. S. H. Han, J. W. Han, and B. C. Shin, Investigation of Fatigue Strength and Prediction of Remaining Life in the Butt Welds Containing Penetration Defects, Int. J. Steel Struct. 10 (1998) 423–435.
34. T. L. Teng and P. H. Chang, Effect of residual stresses on fatigue crack initiation life for butt-welded joints, J. Mater. Process. Technol. 145 (2004) 325–335. https://doi.org/10.1016/j.jmatprotec.2003.07.012
[CROSSREF] 
35. Vuong. Nguyen. Van. Do, C. H. Lee, and K. H. Chang, A nonlinear CDM model for ductile failure analysis of steel bridge columns under cyclic loading, Comput, Mech. 53 (2014) 1209–1222. https://doi.org/10.1007/s00466-013-0964-2
[CROSSREF] 
36. N. V. D. Vuong, C. H. Lee, and K. H. Chang, High cycle fatigue analysis in presence of residual stresses by using a continuum damage mechanics model, Int. J. Fatigue. 70 (2015) 51–62. https://doi.org/10.1016/j.ijfatigue.2014.08.013
[CROSSREF] 
37. N. V. D. Vuong, C. H. Lee, and K. H. Chang, A constitutive model for uniaxial/multiaxial ratcheting behavior of a duplex stainless steel, Mater. Des. 65 (2015) 1161–1171. https://doi.org/10.1016/j.matdes.2014.08.046
[CROSSREF] 
38. Y. N. Paik and Y. K. Chang, Fatigue Life Assessment of Steel Bridge Butt Joint Weld with Defects, J. Korean Weld. Join. Soc. 18 (2000) 77–85.
39. Y. N. Paik and Y. K. Chang, An Experimental Study on Allowable Size of Incomplete Penetration in Butt Joint Bridge Weld Considering Fatigue Strength, J. Korean Weld. Join. Soc. 18 (2000) 68–75.
40. S. S. Wang, K. H. Chang, and S. Muzaffer, Fatigue analysis of cruciform welded joint with weld penetration defects, Eng. Fail. Anal. 120 (2021) https://doi.org/10.1016/j.engfailanal.2020.105111
[CROSSREF] 
41. A. Ikram, A. Raza, and H. Chung, Investigation of Single Pass Welding of Thick AH36 Steel Plates in a Square Groove Butt Joint Configuration During AC- GMAW, J. Weld. Join. 38 (2020) 254–262. https://doi.org/10.5781/JWJ.2020.38.3.4
[CROSSREF] 
42. E. J. Oh, D. H. Lee, S. W. Cho, Y. I. Choi, and K. W. Nam, Effect of the Holding Time during Solution Heat Treatment on Intergranular Corrosion of Unstabilized Austenitic Stainless Steels, J. Weld. Join. 38 (2020) 278–288. https://doi.org/10.5781/JWJ.2020.38.3.7
[CROSSREF] 
43. W. J. Seong, J. S. Yoo, and K. H. Yun, Deformation Prediction Algorithm for Smart Manufacturing of Large Welded Structures, J. Weld. Join. 38 (2020) 98–104. https://doi.org/10.5781/JWJ.2020.38.1.11
[CROSSREF] 
44. C. M. Yu, S. Y. Kim, J. H. Park, G. J. Seo, and S. M. Cho, A Study on Deformation According to Welding Speed of Root Pass in GTAW Butt Joint Welding, J. Korean Weld. Join. Soc. 37 (2019) 493–500. https://doi.org/10.5781/JWJ.2019.37.5.9
[CROSSREF] 
45. API 2A-WSD (RP 2A-WSD), Recommended practice for planning, designing and constructing fixed offshore Platforms-Working Stress Design, API RECOM- MENDED PRACTISE TWENTY-FIRST EDITION, DECEMBER (2000).
46. D. N. Van Vuong, Ph. D. Thesis Finite Element Mo- deling of Fatigue Damage and Its Evolution in Steel Structures, (2014)


ABOUT
BROWSE ARTICLES
ARTICLE CATEGORY 
FOR CONTRIBUTORS
Editorial Office
#304, San-Jeong Building, 23, Gukhoe-daero 66-gil, Yeongdeungpo-gu, Seoul 07237, Korea
Tel: +82-2-538-6511    Fax: +82-2-538-6510    E-mail: koweld@kwjs.or.kr                

Copyright © 2024 by The Korean Welding and Joining Society.

Developed in M2PI