Comparison of Weldability Misalignment between Rivets and Electrodes in Aluminum/Steel Resistance Element Welding
알루미늄/스틸 이종소재 REW(Resistance element welding)의 리벳과 전극의 오정렬에 따른 용접특성 비교
Article information
Abstract
This study investigate the effect of weld mechanical properties and the failure mode on the distance of misalignment that occurs during resistance element welding (REW) when the base sheet (steel plate) overlaps the cover sheet (aluminum plate). Differences exist in the tensile shear strength, cross tension strength, ductility ratio, and failure mode based on the distance of misalignment. The length of the nugget diameter is a major factor that influences the mechanical properties and failure mode in the REW. In addition, it is necessary to consider, the asymmetrical nugget shape derived from the abnormal current path which itself results from an increase in the misalignment distance, as well as the stress concentration generating mechanism resulting from the gap between the cover sheet and base material.
1. Introduction
In recent years, technical demand for weight reduction has been gradually increasing in the automotive industry due to the regulations on CO2 reduction and fuel economy1). In the automotive industry, the vehicle weight reduction for fuel economy improvement and the application of eco-friendly power sources, such as electricity and hydrogen energy, have attracted attention as important technologies. In particular, the development of vehicle weight reduction technology is essential for the fuel economy improvement, mileage extension, and CO2 emission reduction of eco-friendly fuel vehicles. To this end, there is growing demand for vehicle parts that use lightweight aluminum and magnesium materials2). Currently, the application of heterojunction between aluminum and steel that has been used is increasing in consideration of technical and economic aspects rather than the use of only aluminum that is specialized for weight reduction. It is difficult, however, to secure weld properties between the two different materials with resistance spot welding, a conventional fusion bonding process, due to the surface oxide layer of aluminum caused by its high oxidation properties as well as different melting points and thermal expansion coefficients between aluminum and steel3). Therefore, the weld properties of heterojunction between aluminum and steel performed using resistance welding and arc welding, which are representative welding technologies in the automobile assembly process, cannot meet mechanical properties for the stiffness and structural characteristics of the vehicle body4). For this reason, various technologies for welding between dissimilar materials have been developed of late. The applicability of welding and bonding between dissimilar materials, including the investment cost and production time, however, needs to be examined.
To overcome these problems, mechanical fastening technologies, such as self-piercing rivets (SPR) and clinching, have been applied in the production process. Their application, however, is limited due to the problems with equipment and processing time as well as the difficulty in responding to the diversification the bonding material thickness5). Resistance element welding (REW) is one of the welding methods that can overcome the problems mentioned above. The REW process is a form of resistance spot welding developed for bonding different materials using a weld rivet. The rivet that has been mechanically fixed in the cover sheet (aluminum plate) through the pre-hole punching method before the welding process is subjected to resistance welding with the base sheet (steel plate). This makes it possible to secure the material properties of steel and to continuously apply the resistance welding process by blocking the formation of complex intermediate compounds between aluminum and steel.
Despite such benefits of the REW process, research on the optimization of related methods and experiment results is not sufficient. Ling et al.6) reported bonding between the A6061 and 22MnMoB plates through the REW process. The REW process secured tensile strength approximately seven times higher than that of the conventional resistance spot welding. In addition, studies have been conducted to overcome the limited mechanical properties of the conventional resistance spot welding by designing new rivets in the REW process. Manladan et al.7) reported bonding between magnesium and steel using a rivet head that has a thickness similar to that of the plate material. Sine a large rivet head was used to secure bonding characteristics, it acted as a negative element for painting and post-processing. Y. H. Oh et al.8) used a newly designed rivet for bonding between the A365 and SGACC plates, and secured mechanical performance by minimizing the head that protrudes from the aluminum plate. It was difficult, however, to maintain mechanical properties for the misalignment between the rivet and electrodes with a 6mm electrode diameter for the rivet.
Although various studies on the REW method have been conducted, accurate standards or specifications for the process and quality have not been established. Electrodes with a diameter of 6 mm or 8 mm have been directly applied to the REW method to reuse the resistance spot welding equipment installed in the existing production line. It is difficult, however, to perform welding by aligning the weld rivet and the center positions of the electrodes on the same line in the process because the diameter of the rivet is almost identical to that of the electrodes. There is no study on the allowable range of the misalignment between the rivet and electrodes by increasing the electrode tip diameter to improve this situation.
In this study, changes in mechanical properties depending on the various thicknesses of the cover sheet with rivet and the misalignment between the rivet and electrodes were compared, and the tensile shear test (TST) and cross tension strength test (CTT) of the weld zone were conducted for the material and thickness combinations of the high-strength DP 980 steel and aluminum plates. In addition, an attempt was made to investigate the causes of deterioration in properties through cross-sectional analysis and failure modes. Mechanical performance was maintained using the newly designed rivet that minimizes the head that protrudes from the aluminum sheet. The cross section of the weld zone was compared and analyzed using an optical microscope and an electron microscope. In addition, the effect of the misalignment distance between the rivet and electrodes on the mechanical properties of the weld zone was evaluated by inducing the incremental offset tolerance.
2. Experimental Method
Fig. 1 shows the schematic of the REW process used in this study. As shown in the figure, the cover sheet that has been pre-assembled with a rivet before the welding process and the base sheet are welded to each other. The DP 980 steel with a thickness of 1 mm was used as the base sheet, and a weld rivet from WELTACⓇ was applied. To compare REW characteristics according to the material and thickness combinations, four types of cover sheets were selected. Table 1 shows welding conditions for each cover sheet in accordance with ISO 18278-2:2004(E)9). For the stabilization of the process, the squeeze time and hold time were equally set to 6 cycles. As for the welding electrodes, Cu-Cr (3wt%) flat type electrodes with a diameter of 16 mm and a tip radius (R) of 100 mm were used.
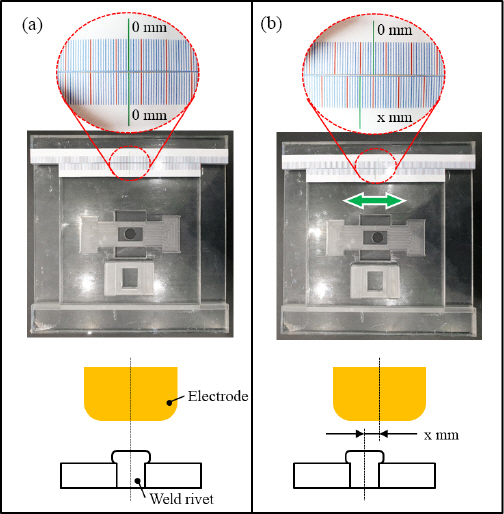
As for the welding equipment, an MFDC resistance spot welder with a frequency of 1,200 Hz and a C-type servo welding gun were used. To stabilize the electrode surface, welding was performed approximately ten times under appropriate welding conditions before performing the main welding. Specimens for TST were fabricated for the weld zone to be overlapped by 35 mm in accordance with ISO 14273:2016(E)10). In addition, specimens for CTT were prepared in a size of 50 X 150 mm and the weld zone was overlapped by 50 mm so that it could be located at the center in accordance with ISO 14272:2016(E)11). The welded specimens were subjected to the tensile tests three times under each welding condition at 5 mm/min, and the average values for the measurements were applied. Fig. 3 shows the method for analyzing welding characteristics according to the misalignment between the center positions of the electrode and rivet. As shown in the figure, the centers of the rivet and electrode were aligned at the beginning by combining the two jigs with attached rulers (Fig. 3(a)), and the center positions of the rivet and electrode were adjusted by moving the jigs. In this instance, the misalignment between the center positions of the electrode and rivet ranged from 0 to 4 mm at 1mm intervals for the analysis of the tensile specimens and cross sections.

The method for adjusting the alignment position of electrodes and rivets; (a) no misalignment : 0 mm, (b) misalignment : x mm
3. Results and Discussion
3.1 Analysis of mechanical properties and failure modes according to the material and thickness combinations
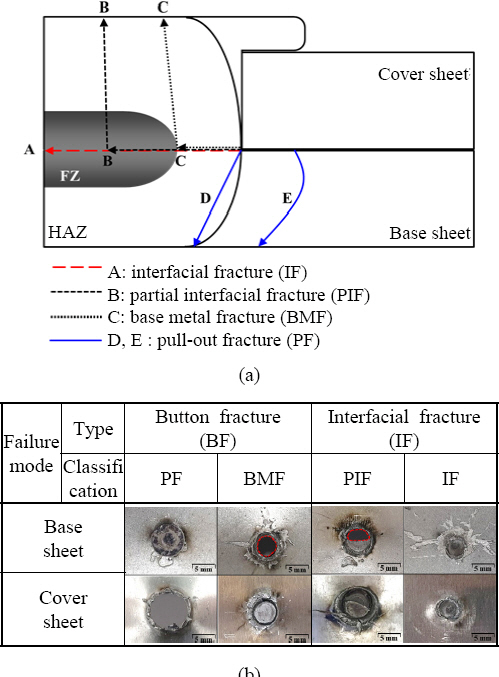
To examine the correlation between the weld zone failure mode and tensile strength, failure modes that occur in the REW process were analyzed and defined. Fig. 4(a) shows the representative failure modes of the REW process and the schematic of the cross section for each fracture type. The weld zone failure modes are mainly divided into the button fracture (BF) and interfacial fracture (IF) depending on the fracture type. The fracture in the D and E paths of Fig. 4(a) means that a fracture occurred in the form of maintaining or preserving the rivet geometry and cover sheet and it is propagated to the base sheet or heat affected zone (HAZ) of the base sheet located at the bottom. In the case of the base sheet fracture, a fracture type as shown in the C path, the fracture propagates along the fusion line or propagates in the rivet thickness direction after passing through some of the weld zone. These two fracture types belong to BF. In the case of IF and partial IF, i.e. fractures in the A and B paths, the fracture propagates along the interface between the base sheet and cover sheet or it propagates along the upper part of the base sheet12).

Classification of failure modes after mechanical failure test: (a) schematic, (b) the two type of failure modes
For a quantitative comparison of welding characteristics according to the misalignment of the rivet head and electrodes, TST and CTT were conducted for different cover sheet types. In addition, the ductility ratio was compared in section 3.2 through the measured tensile shear strengths and cross tension strengths. Fig. 5 shows the results of analyzing the mechanical properties of the cover sheet according to the material and thickness combinations presented in Table 1 and the misalignment between the rivet and electrodes. Overall, the specimens under the same welding conditions exhibited different maximum values for the tensile shear strength and cross tension strength. This appears to be because two-dimensional effects that affect tensile strengths, such as material characteristics (e.g. alloy composition and physical properties), welding conditions, geometric characteristics, and load conditions, are closely related to each other13). In addition, as the misalignment distance from the center position (misa- gnment=0mm) increased, the tensile shear strength and cross tension strength sharply decreased. At a misalignment distance of 3 mm or 4 mm or higher, mechanical strength could hardly be secured. This is because sufficient nuggets were not created as melting progressed in a limited contact area due to the misalignment between the electrodes and rivet.
In the case of the combination with a cover sheet thickness of 1.2 mm in Fig. 5(a), the tensile shear strength showed a tendency to decrease as the misalignment distance increased. As for the failure mode, BF (-■-) occurred at the center position and IF (-□-) occurred when the misalignment distance was 1 mm or higher. The cross tension strength also decreased as the alignment distance increased in a similar manner to the tensile shear strength. As for the failure mode, IF (-△-) occurred for all misalignment distances except for BF (-▲-) at 0 mm. Due to the thin plate thickness and the insufficient nugget diameter for stable BF in the experiment, the maximum tensile shear strength and cross tension strength at which BF occurred were not high, and IF and BF were mixed even at an alignment distance of 1 mm.
In the case of the combination with a cover sheet thickness of 2.0 mm in Fig. 5(b), BF occurred at misalignment distances between 0 and 2 mm for the tensile shear strength, and the minimum critical load for the occurrence of BF was found to be approximately 10.5 kN. IF occurred when the misalignment distance exceeded 2 mm, and the maximum load also sharply decreased to less than 7 kN. The CTT results showed that the failure mode changed from BF to IF from a misalignment distance of 1 mm, and the critical load for the occurrence of BF appears to be 6 kN. For the combination with a plate thickness of 2 mm, the maximum allowable misalignment distance for the occurrence of BF appears to be 2 mm in TST and 1 mm in CTT. In the case of the tensile shear strength in Fig. 5(c), IF occurred regardless of the misalignment distance. For the cross tension strength, the failure mode changed from BF to IF from a misalignment distance of 1 mm. In addition, when the misalignment distance was 4 mm, the physical property value was 0 for both TST and CTT because a cold weld in which only the surface was slightly melted was observed. In the case of the combination with a cover sheet thickness of 3 mm (Fig. 5(d)), the failure mode changed at a misalignment distance of 2 mm for the results of both strength tests. The minimum critical loads for BF appears to be 10 and 5 kN, respectively. Regardless of the combination, IF occurred as the failure mode for both tests when the misalignment distance was 3 mm or higher. Based on these tensile test results and failure modes, the ductility ratio and the cross-sectional images of the weld zone were additionally investigated in sections 3.2 and 3.3.
3.2 Comparison of the ductility ratio according to the material and thickness combinations
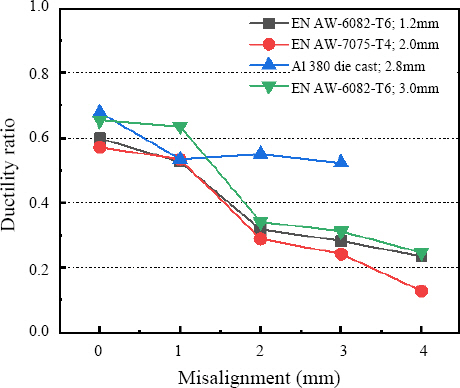
When a tensile or compressive load is applied to a part welded through resistance welding, the welding design is reflected so that a shear load can be applied to the weld zone. Since tensile shear loads are simultaneously applied to the weld zone in many cases, however, it is necessary to examine mechanical properties under such conditions14). To evaluate these properties, CTT or the fatigue test of the weld zone is conducted in addition to TST as requested by standards. To evaluate the ductility of the weld zone in resistance welding, the tensile shear strength and cross tension strength are obtained and then the ratio between them is calculated. This ratio is defined as the ductility ratio. The ductility ratio is used as an index for judging the characteristics of the weld zone of high-strength thin-plate steel15). It was reported that when the ductility ratio of a resistance weld is less than approximately 0.4, the insufficient response of the weld to tensile stress and the high stress concentration factor cause the fast fracture of the weld16). In addition, in the case of the weld zone under high heat input conditions or abnormal welding conditions, the generation of microstructures, welding defects, ductility, and embrittlement accelerates the occurrence of stress concentration due to the morphologically non-cracking and discontinuous fusion zone. Fig. 6 shows the ductility ratio according to the material and thickness combinations. The ductility ratio was less than 0.4 when the misalignment distance was 2 mm or higher for all the material combinations except for the combination with a thickness of 2.8 mm. As the misalignment distance increased, the ductility ratio continuously decreased. This indicates that the stress concentration factor increased from a misalignment distance of 2 mm due to the increase in the mechanism of tensile shear stress concen- tration. As the misalignment distance increased, the nugget diameter of the weld zone decreased and the shape of the nugget became asymmetrical. In addition, when the misalignment distance was 2 mm or higher, it was difficult to secure reliability for the mechanical properties of the weld zone under the simultaneous application of tensile shear loads to the weld zone. The combination with a cover sheet thickness of 2.8 mm and the aforementioned correlation between the weld zone failure mode and tensile strength were additionally investigated in section 3.3 based on the comparison results for the weld zone heat input pattern and nugget diameter.
3.3 Analysis of the weld zone heat input pattern and nugget geometry according to the material and thickness combinations
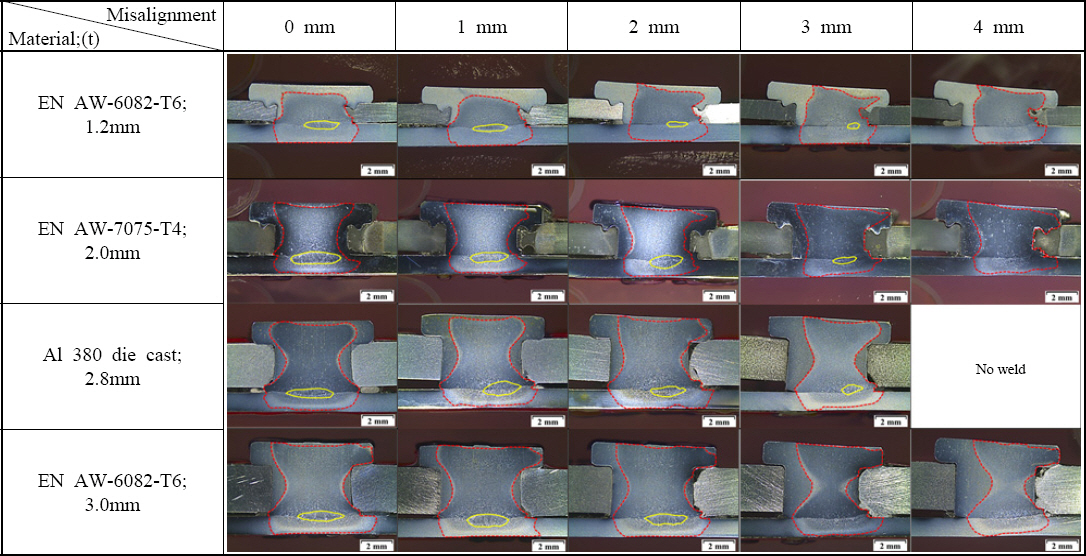
To compare the mechanical properties, failure mode, and ductility ratio of the weld zone with the cross-sectional images of the zone according to the misalignment between the rivet and electrodes, the weld zone heat input pattern and nugget diameter according to the material and thickness combinations in Table 1 were shown in Fig. 7 and 8. Fig. 7 shows the weld zone heat input pattern and nugget geometry according to the cover sheet combination and misalignment distance. The weld zone heat input pattern represents the trace of the current flow path, and the heating behavior can be indirectly predicted through the heat input pattern shown in Fig. 717). For all of the four combinations, the nugget formation position moved from the center of the rivet to the right side (misalignment direction) as the misalignment distance increased. In addition, the nugget diameter at the center position decreased, and the nugget geometry became more asymmetrical. In this instance, as the collapse geometry of the rivet was inclined to the right side due to the misalignment between the rivet and electrodes, the gap between the base sheet and cover sheet on the left side of the rivet increased as the misalignment distance increased. In addition, the geometry inclined to the right side was intensified from a misalignment distance of 2 mm. When the misalignment distance was 4 mm, bonding between the rivet and base sheet did not occur and bonding was observed at some positions close to the cover sheet. This is because the load transmission area under electrode pressurization changed by the misalignment distance due to the misalignment between the rivet and electrodes. In addition, the cover sheet was affected by heat (1.2 and 2.0 mm) in the parts where inclination occurred (right side). This appears to be due to the occurrence of heating behavior completely different from that under the alignment condition. The inclination of the heat input pattern geometry to the right side due to the change in heating behavior by the misalignment distance indicated that the asymmetrical pattern occurred due to the abnormal current flow caused by the limited current flow area18). In the case of the Al 380 die cast cover sheet with a thickness of 2.8 mm in Fig. 7, it appears that the ductility ratio was higher than 0.4 because stress concentration was dispersed and the stress concentration generation mechanism was small due to the gap between the base sheet and cover sheet that occurred from the rivet selection. Fig. 8 shows the nugget diameter for each plate combination according to the misalignment distance. When the rivet and the base sheet were aligned, the nugget diameter of the weld zone ranged from 2.5 to 3.2 mm. As the misalignment distance increased, the nugget diameter showed a tendency to decrease and some increasing sections were observed. This is because it was difficult to clearly distinguish the junction between the base sheet and cover sheet due to the asymmetry of the nugget during nugget diameter measurement and because the conora bond area occurred around the junction. The nugget diameter reduction and asymmetrical nugget geometry are expected to affect mechanical properties and the failure mode. In other words, the tensile shear strength, cross tension strength, and ductility ratio of the REW weld zone vary depending on the misalignment distance because the stress concentration generation mechanism changes as the misalignment distance increases due to the asymmetrical nugget geometry and the occurrence of a gap between the cover sheet and base sheet caused by the abnormal current flow path even though the nugget diameter acts as a main factor.

Analysis of heat input pattern & nugget formation change according to different cover sheet with misalignment distance
4. Conclusion
In this study, the mechanical properties of rivet-attached cover sheets with different thicknesses were investigated according to the misalignment between the rivet head and welding electrodes. The tensile shear strength and cross tension strength of the weld zone according to the misalignment distance were compared and analyzed for the material and thickness combinations of high-strength DP 980 steel and aluminum plates. In addition, the causes of deterioration in properties were investigated through cross-sectional analysis and failure modes.
1) As the misalignment distance increased, the tensile shear strength and cross tension strength sharply de- eased. When the misalignment distance was higher than 3 or 4 mm, mechanical strength was hardly secured. This is because it was difficult to secure sufficient nuggets as fusion progressed in a limited contact area due to the misalignment distance.
2) For most of the material combinations, the ductility ratio was less than 0.4 from a misalignment distance of 2 mm, and the ductility ratio was inversely proportional to the misalignment distance. This is because the stress concentration factor increased due to the increase in tensile shear stress concentration mechanism from a misalignment distance of 2 mm. In the case of the Al 380 die cast cover sheet with a thickness of 2.8 mm, it appears that the ductility ratio was higher than 0.4 because stress concentration was dispersed and the stress concentration generation mechanism was small due to the gap between the base sheet and cover sheet that occurred from the rivet selection.
3) The mechanical properties and ductility ratio of the resistance element welding (REW) weld zone vary depending on the misalignment distance because the stress concentration generation mechanism changes as the misalignment distance increases due to the asymmetrical nugget geometry and the occurrence of a gap between the cover sheet and base sheet caused by the abnormal current flow path even though the nugget diameter acts as a main factor.
Acknowledgement
This study has been financially supported by the Ministry of Economy and Finance and conducted with the support of the Korea Institute of Industrial Technology as “Development of Smart Manufacturing Technology for Low Temperature Fuel Tank for LNG Ships project (kitech PJA21080 (JA210008)”.


