1. Introduction
In recent years, demands for the lightweight vehicle body and components have been increasing in the automobile industry due to environmental regulations on energy saving and CO
2 emissions, and studies have been conducted to achieve weight reduction using various multi-materials, such as aluminum and CFRP. With an increase in the application of multi-materials and related studies, welding and joining technologies for dissimilar materials are also becoming more important
1). Representative methods for joining various dissimilar materials includes Self-Piercing Riveting (SPR) and Flow Drill Screw (FDS).
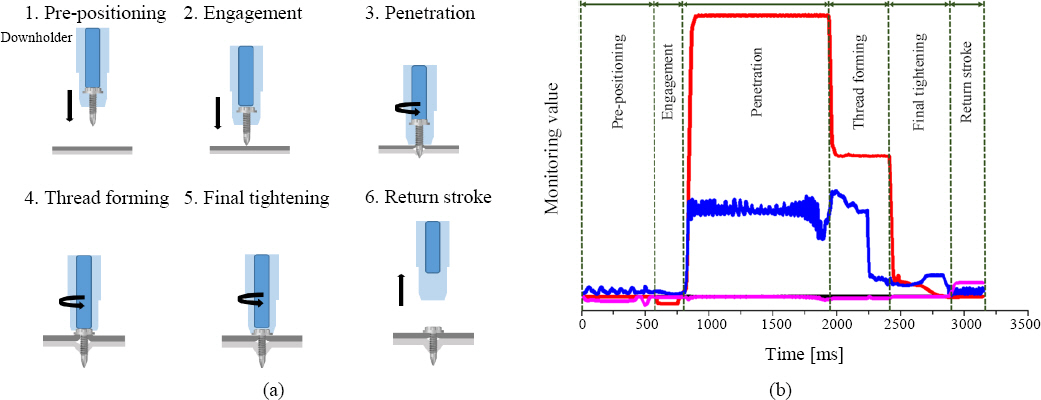
FDS is a fastening method that can mechanically join two or more plates using fasteners at high speed. The FDS process consists of six process steps: Pre-positioning, Engagement, Penetration, Thread forming, Final tightening, and Return stroke. The main process variables of FDS are the down force, rotation speed, torque, and feed rate. In addition, FDS provides a simple process, less restrictions on materials that can be jointed, and uniform joint performance. It allows joining from one side unlike the SPR process, which requires both sides of a die and a punch. These benefits have increased the use of the FDS joining process. Accordingly, studies have been conducted on the fastening quality and mechanical properties of the FDS joints. Aslan et al studied the effect of process variables such as the rotational speed and down force on defects like chip formation and its implications in joint failure
2,3). Skovron et al. conducted research on the influence of down force, an input process variable, on the deformation of the plate, the size of the gap, the geometry of the bushing, and the tensile shear strength
4-7). However, the aforementioned studies have focused on the similar Al-Al combinations and their joining quality, and studies on the dissimilar joining of Steel-Al combination is still very scarce./limited. Studies on the effects of the feed rate and final torque, among the process variables of FDS, on the process and FDS joint quality are also insufficient. In particular, many studies have been conducted to examine weld quality using the dynamic resistance analysis, which is the electrical signal output monitoring data, as in the case of resistance spot welding, but few studies have been conducted on the monitoring data for the FDS joint.
In this study, for the FDS joint of Steel/Al combination, the influence of the process variables (down force, feed rate, and torque) on each step of the FDS process (penetration, thread forming, and final tightening) was investigated through a monitoring data analysis. In addition, the gap between the plates was measured through the analysis of the joint cross-section, and the impact of the size of the gap on the final joint quality according to the process variables was investigated through the tensile shear test and hardness test.
2. Experimental Method
2.1 Experimental materials
In this study, DEPRAGŌĆÖs Flow Form Screw driving (FFS) equipment was used as the FDS joining equipment, and EJOTŌĆÖs Zn-Ni plated M4 fastener was used as shown in
Fig. 1. A 1.0mm-thick 590 MPa galvanized dual phase steel sheet for automobiles was used as the top plate, and a 2.0mm-thick aluminum 5052-H32 sheet as the bottom plate. Specimens of 100 mm ├Ś 30 mm with an overlap of 30 mm were prepared in accordance with the KS B 0802:2003 standard as shown in
Fig. 2.
Fig.┬Ā1
Schematic illustration and dimensions of fastener (M4)
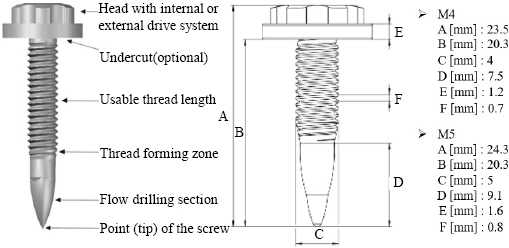
Fig.┬Ā2
Dimensions of tensile shear test for 590 DP steel/ AA5052 FDS joints

2.2 Analysis method
The FDS process has six steps. As can be seen from the schematic diagram of the FDS process in
Fig. 3(a), the holder of the FDS equipment is positioned at the joint position in the pre-positioning step, and the fastener of the holder is aligned at the joint position in the engagement step. In the penetration step, the fastener begins to rotate and performs penetration with frictional heat and pressure. In the thread forming step, the objects to be joined are penetrated and a thread is formed in the hole created. The top and bottom plates are brought closer by tightening the fastener head in the final tightening process afterwards, and the holder returns to its original position upon the completion of joining in the return stroke step
8).
Fig. 3(b) shows the typical monitoring data according to the process variables (down force, torque, rotation speed, and feed rate) in each process step.
Fig.┬Ā3
Schematic diagram (a) principle of FDS process and (b) FDS process-curve
In this study, the monitoring data were analyzed for each process step (penetration, thread forming, and final tightening) and each process variable (down force, feed rate, and torque) to analyze the influence of the process variables on each process step. The pre-positioning, engagement, and return stroke steps were excluded because there is no direct contact between the fastener and the objects to be joined. In addition, there is a difference in available joining section depending on the material because the steel material can be well fastened under high down-force and low rotation speed conditions while the aluminum material can be fastened only under low down force and high rotation speed conditions. To control the difference in joining section between the steel and aluminum materials, the materials were joined by applying the rotation speed as a fixed variable in this study.
Table 1 shows the fastening conditions used in this study for each process step. For DEPRAGŌĆÖs FDS equipment used for fastening, input variables and output variables (MV-Monitoring Value) that can be checked through the monitoring data are separated for each process step. The input variables include a target value and a limit value (LV-Limited value).
Table┬Ā1
Process parameters of FDS used for 590DP Steel/AA5052 combination at each process steps M.V. : Monitoring Value L.V. : Upper Limit Value
|
Penetration |
Thread forming |
Final tightening |
|
Fastening condition |
Down force [N] |
Feed rate [mm/s] |
Torque [Nm] |
Rotation speed [RPM] |
Down force [N] |
Feed Rate [mm/s] |
Torque [Nm] |
Rotation speed [RPM] |
Down force [N] |
Feed rate [mm/s] |
Torque [Nm] |
Rotation speed [RPM] |
|
1 |
1,200 |
35 |
M.V, |
4,000 |
M.V, |
M.V, |
M.V, |
2,000 |
300(L.V.) |
M.V, |
4.5 |
300 |
|
2 |
1,200 |
35 |
M.V, |
4,000 |
M.V, |
M.V, |
M.V, |
2,000 |
300(L.V.) |
M.V, |
4.5 |
300 |
|
3 |
1,200 |
35 |
M.V, |
4,000 |
M.V, |
M.V, |
M.V, |
2,000 |
300(L.V.) |
M.V, |
4.5 |
300 |
|
4 |
1,200 |
45 |
M.V, |
4,000 |
M.V, |
M.V, |
M.V, |
2,000 |
300(L.V.) |
M.V, |
4.5 |
300 |
|
5 |
1,200 |
45 |
M.V, |
4,000 |
M.V, |
M.V, |
M.V, |
2,000 |
300(L.V.) |
M.V, |
5.5 |
300 |
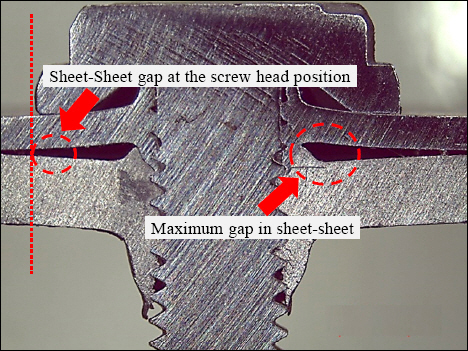
The joint quality was evaluated through the cross-sectional analysis, tensile shear testing and hardness measurement. For the cross-sectional analysis, the fastened specimens were cut and polished, and their cross- sectional images were captured using a stereoscopic microscope. In order to understand the changes in gaps under different fastening conditions, the 2 major gaps observed in FDS were analyzed. Firstly the sheet-sheet maximum gap, which represents the gap at the interface between the top and bottom sheets, and second is the sheet-sheet gap at the screw head position as shown in
Fig. 4. For the evaluation of mechanical properties, the peak load and failure mode were examined through the tensile shear test under each fastening condition, and the Vickers hardness test was conducted at a load of 0.1 kgf and 0.5mm intervals from the interface between the plate and fastener. To investigate changes in temperature according to the fastening conditions, the maximum temperatures of the top plate and fastener, which are fastened together at the 0-700┬░C temperature range and an emissivity of 0.3, were measured using NECŌĆÖs TH9100MRI/WRI thermal imaging camera.
Fig.┬Ā4
Definition of sheet-sheet gap in the FDS joint
3. Experiment Results and Discussion
3.1 Monitoring data analysis for process step
3.1.1 Penetration step analysis
Through the analysis of the monitoring data, the influence of three process variables (down force, feed rate, and torque) on the penetration step of the FDS process was investigated. From
Table 1, it is to be noted that within the penetration step, the input variables are the down force and feed rate. The torque would be the out put variable which is to be monitored in this phase.
Fig. 5(a) shows the monitoring data for the output value of the down force over time. When the rotation speed was fixed at 4,000 RPM, the shortest process time was observed at an input down force value of 1,400 N. At 1,200 N, more than 2,500 ms was required. This indiates that the time required for the penetration step increased as the magnitude of the down force decreased. In particular, the time exceeded 2,000 ms when the down force was lower than 1,200 N, a threshold value. For all of the five process conditions, rapid changes corresponding to the upper and lower limits of approximately 300 N occurred at the beginning and end of the penetration step was observed, which was magnified in the rectangular box along with graph. It appears that large changes in down force occurred at the beginning of the penetration step because a temperature sufficiently high for high-temperature plastic deformation and hole processing could not be reached during the drilling of the top plate. As drilling continued, the plate temperature increased and the output value of the down force remained relatively constant after 1,000 ms. Similarly large changes in down force occurred again at the end of the process time because the temperature of the bottom plate was not sufficiently high for plastic deformation and hole processing when the bottom plate was in contact with the fastener after the drilling of the top plate. The monitoring data for the output value of the feed rate also revealed similar changes at the beginning and end of the process as shown in
Fig. 5(c). This appears to be due to the same reason as explained for the changes in Down force monitoring within the penetration step.
Fig. 5(b) shows the monitoring data for the output value of the torque in the penetration step. For all fastening conditions in
Table 1 except for condition 1, the maximum output value of the torque reached 2.5 NŌłÖm. Under Condition 1 in which the output value of the torque could not reach 2.5 NŌłÖm, fastening failed because local melting occurred at the end of the fastener. This indicates the presence of a threshold torque value for the success of fastening in the penetration step.
Fig.┬Ā5
Monitoring data of (a) Down force, (b) Torque, and (c) Feed rate with time at five process conditions in penetration stage of FDS

Under conditions 1, 2, and 3 in
Table 1 for which the feed rate value was identical (35 mm/s), the time required for the penetration step decreased as the input value of the down force increased from 1,200 to 1,400 N, which is shown in
Table 2. In the penetration step, there was an approximately 10 mm/s difference in feed rate between conditions 1 (35 mm/s) and condition 4 (45 mm/s), even though the input value of the down force was the same (1,200 N). The time required for the penetration step was 3,012 ms for condition 1 and 1,818 ms for condition 4, Approximately, 1200 ms was reduced as shown in
Table 2. This indicates that despite the same down force the process time could be decreased by changing the feed rate.
Table┬Ā2
Process time and peak temperature of each process stage with five fastening conditions
|
Time required by process stage |
Peak temperature (┬░C) |
|
Fastening Condition |
Penetration (ms) |
Thread forming (ms) |
Final tightening (ms) |
|
1 |
3,012 |
No thread forming |
N/A |
Fastener melting |
|
2 |
778 |
585 |
480 |
540.8 |
|
3 |
530 |
604 |
281 |
469.3 |
|
4 |
1,818 |
424 |
323 |
638.1 |
|
5 |
898 |
562 |
779 |
580.1 |
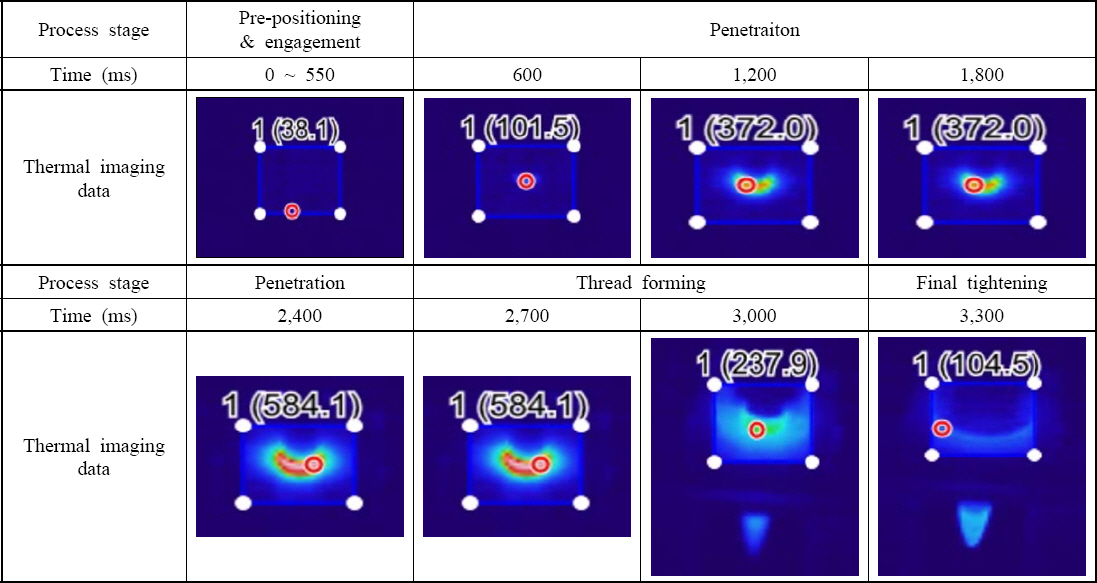
Fig. 6 shows the thermal imaging data over time for fastening condition 4. As fastening progressed, the temperature of the joint reached a peak temperature of 584 ┬░C at 2,400 ms. After reaching the highest temperature in the penetration step, the temperature tends to decrease slowly. As can be seen from
Table 2, the peak temperature in the penetration step showed a tendency to increase as the process time increased. This appears to be because the frictional heat between the plate and fastener continuously occurred and the heat was accumulated as the process time increased. In this instance, it was observed that hole drilling of the upper 590DP steel was possible when the input down force value was high even though the peak temperature in the penetration step was as low as 469┬░C. Therefore, the down force and feed rate affect the process time and peak temperature of the penetration step, and the process time and peak temperature decrease as the down force increases and the feed rate increases.
Fig.┬Ā6
Thermal imaging data at the upper sheet with the process time of fastening condition of No. 4
3.1.2 Thread forming step analysis
The influence of the process variables (down force, torque, and feed rate) on the thread forming step was examined through the analysis of the monitoring data.
Fig. 7(a) shows the monitoring data for the output value of the down force. Large signal width changes occurred in the 800-1,200N section at the beginning of the thread forming step. Such changes in the output signal value of the down force appear to have been caused by the generation of a thread in the top plate. In addition, the output value of the down force significantly changed in the 200-400 N section at the end of the process. This change is due to the rapid changes in torque caused by the formation of a thread in the bottom plate. In
Fig. 7(b), changes in torque were observed at similar time points when changes in down force occurred under each condition as shown in
Fig. 7(a).
Fig.┬Ā7
Monitoring data of (a) Down force, (b) Torque, and (c) Feed rate with five fastening parameters in the thread forming stage

In addition, as shown by the top sheet and bottom sheet in
Fig. 7(a), the output value of the down force rapidly decreased after the formation of a thread in the top plate, and the change in down force during the formation of a thread in the bottom plate occurred at a lower section compared to the top plate. This is because, thread formation in the top plate has already been completed during the thread formation at the bottom plate and the bottom plate material (AA5052) had a lower tensile strength than the top plate material (590DP Steel).
Fig. 7(c) shows changes in feed rate in the thread forming step. The influence of feed rate on the thread forming step was found to be insignificant.
As the input value of the down force increased, the process time decreased in the penetration step, but increased in the thread forming step as shown in
Table 2. In the penetration step, the friction between the fastener and plate increased as the down force increased, and the shortest process time of 530 ms and a low peak temperature of 469┬░C were observed under condition 3.This appears to be because a temperature sufficiently high enough for thread forming was not attained, also in the thread forming step, thereby making the plastic deformation of the material difficult and increasing the process time of the thread forming step.
3.1.3 Final tightening step analysis
As shown in
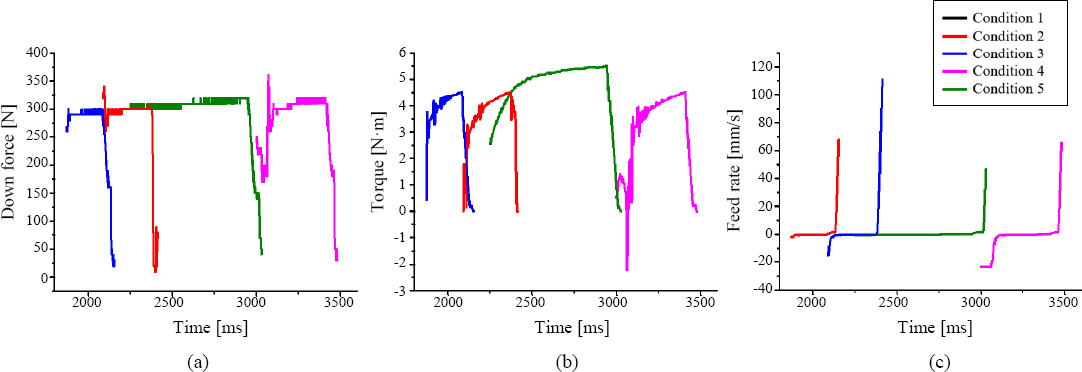
Fig. 8, there is no significant change in the monitoring data for the output values of the down force and feed rate in the final tightening step. In this step, the torque is an input variable unlike in the penetration and thread forming steps. When conditions 2, 3, and 4 in
Table 2 were compared, it was found that the process time of the final tightening step decreased as the input value of the down force increased in the penetration step. Under condition 5, however, the process time rather increased even though the down force was lower compared to conditions 3 and 4. The torque for condition 5 was 5.5 N├Śm, which was 1N├Śm higher compared to conditions 1, 2, 3, and 4. It appears that the process time increased because it took time for the torque to reach the input value.
Fig.┬Ā8
Monitoring data of (a) Down force, (b) Torque, and (c) Feed rate with five fastening parameters in the Final tightening stage
3.2 Influence of the FDS process variables on fastening quality
To analyze the influence of the FDS process variables on the fastening quality of the 590DP Steel/AA5052 combination, a cross-sectional analysis was conducted, and mechanical properties were analyzed for each fastening condition.
3.2.1 Cross-sectional analysis
The maximum gap at the plate interface and the gap around the fastener head were measured as shown in
Fig. 4, and the results are shown in
Table 3. In the penetration step, the size of the gap at the plate interface increased as the input value of the down force increased. This appears to be because an increase in down force in the penetration step decreased the process time and made the high-temperature plastic deformation of the materials difficult due to the insufficient heating of the plates, thereby causing the deflection of the bottom plate. This indicates that high heating for facilitating the high-temperature plastic deformation of the materials and sufficient time are required to minimize the gap at the plate interface. To secure required heating, it is necessary to increase the process time with somewhat low down force or to increase frictional heat through a high rotational speed.
Under fastening condition 5, the process time of the penetration step decreased, and the peak temperature was also approximately 50┬░C lower compared to fastening condition 4 because the input value of the down force was 50 N higher. Therefore, an increase in gap size at the plate interface was expected because the high-temperature plastic deformation of the materials was difficult, and the deflection of the top and bottom plates increased. Under condition 5, however, the sheet- sheet maximum gap was smallest among all fastening conditions. This is because the deflection of the bottom plate was controlled through a relatively high torque value in the final tightening step. This indicates that the size of the gap at the plate interface can be reduced to a certain degree in the final tightening step. Since thin plates with thicknesses of 1.0 and 2.0 mm were used as top and bottom plates respectively in this study, respectively, however, it is expected that control in the final tightening step will be limited as the material thickness increases.
3.2.2 Mechanical properties of the FDS joint
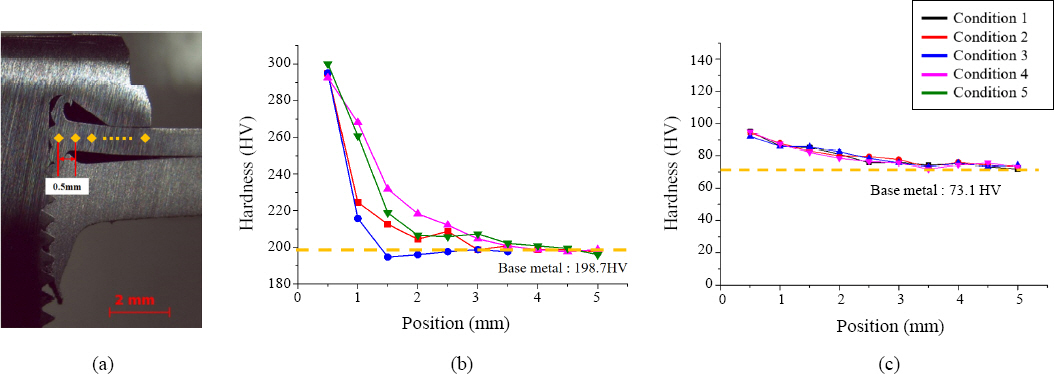
Fig. 9 shows the Vickers hardness measurements at the interface between the fastener and plate for each fastening condition. In the top plate area, close to the contact surface with the fastener (
Fig. 9(a)), the Vickers hardness value reached 300 HV, which was approximately 100HV higher than the hardness of the 590DP steel (198 HV). This appears to be because the martensite fraction increased due to the non-equilibrium phase transformation caused by rapid cooling after rising to the A
1 transformation temperature or higher in the Fe-C phase diagram in the penetration step. For fastening conditions in which the process time in the penetration step increased, an increase in the hardness of the top plate was observed in a wider area. This is because the peak temperature increased and heat was conducted to a wider area from the interface between the top plate and fastener as the process time in the penetration step increased as mentioned in the results of
Table 2. For the bottom plate, however, no significant change in hardness was observed under each fastening condition as shown in
Fig. 9(b). This is because the heat treatment effect was insignificant as most of the heat from the bottom plate made of AA5052 was rapidly conducted toward the base metal of the bottom plate due to its high thermal conductivity.
The results in
Table 3 indicate that a fastener pullout mode (in which the fastener was separated from the bottom sheet) was observed as the failure mode irrespective of the fastening conditions. Since the hardness of the bottom plate made of A5052 is approximately a third of that of the top plate made of 590DP steel despite its thickness of 2.0 mm, fracture occurs first in the bottom plate under a shear load. The maximum load ranged from 5.0 to 5.5 kN depending on the fastening condition. It showed a tendency to increase as the sheet-sheet gap decreased, but the difference was too insignificant to identify the effect of the gap. When the failure mode was examined for the FDS joint of the 590DP Steel/AA5052 combination, it was found that the fastening force between the bottom plate and fastener was an important factor. It appears that the difference in fastening strength at the time of failure was insignificant because there was almost no difference in the hardness of the bottom plate depending on the fastening conditions applied in this study.
Fig.┬Ā9
Micro hardness of (a) top sheet and (b) bottom sheet for five FDS fastening conditions
4. Conclusion
In this study, for the flow drill screw (FDS) joint of Steel/Al combination, the influence of the process variables (down force, feed rate, and torque) on each step of the FDS process (penetration, thread forming, and final tightening) was analyzed through the monitoring data. In addition, the effects of the process variables on the final fastening quality were investigated through a cross-sectional analysis and mechanical property evaluation. The conclusions of this study are as follows.
1) In the penetration step, the process time increased as The magnitude of the down force decreased. In particular, it exceeded 2,000 ms when the down force was 1,200 N or less. For process conditions in which it was difficult to reach the threshold torque value for the completion of penetration, the required time increased, and heating increased between the end of the fastener and plate, resulting in fastening defects, such as the melting of the fastener.
2) In the thread forming step, the process time increased as the input value of the down force increased unlike the penetration step. In the penetration step, the friction between the fastener and plate increased as the down force increased. In the thread forming step, however, the process time increased because it was difficult to secure a temperature sufficiently high for forming a thread and to generate high-temperature plastic deformation due to the low temperature.
3) In the penetration step, the process time decreased as the down force increased. Since sufficient heating could not be formed in the plates, high-temperature plastic deformation was difficult and the deflection of the bottom plate occurred due to the down force, thereby increasing the gap size. To secure required heating, it is necessary to secure the process time with somewhat low down force or to increase frictional heat through a high rotational speed.
4) In the top plate area close to the contact surface with the fastener, the Vickers hardness value reached 300 HV and hardening occurred. This is because the martensite fraction increased due to the non-equilibrium phase transformation. In addition, fastener pull-out from the bottom aluminum plate was observed as the failure mode under all fastening conditions. This is attributed to the low hardness of the aluminum plate. The difference in fastening strength at the time of failure was insignificant because there was almost no difference in the hardness of the bottom plate depending on the fastening conditions.
Acknowledgement
This work was supported of the Ministry of Trade, Industry and Energy for a study on ŌĆ£Development of advanced forming and joining technologies for light- weight car body with multi-materials(NO. 20002809)ŌĆØ and Busan Innovation Institute of Industry, Science & Technology Planning(BISTEP) grant funded by the Busan Metropolitan City (Project Name: Open Laboratory Business Meeting Market Demands)
References
1. ņä▒ļ░░. ņĄ£, ņāüņÜ░. Ļ╣Ć, and ņäĀĻ▓Į. ņĀĢ, ņ×ÉļÅÖņ░© Ļ▓Įļ¤ēĒÖö ĻĖ░ņłĀļÅÖĒ¢źĻ│╝ Ļ░£ļ░£ņĀäļץ, ĒĢ£ĻĄŁĻ│╝ĒĢÖĻĖ░ņłĀņĀĢļ│┤ņŚ░ĻĄ¼ņøÉ, ĒĢ£ĻĄŁ. (2013)
3. F. Aslan, L. Langlois, and T. Balan, Experimental analysis of the flow drill screw driving process,
Int. J. Adv. Manuf. Technol. 104 (2019) 1ŌĆō12.
[CROSSREF] [PDF] 5. J. D. Skovron, Doctor of Philosophy, Slip-Stick Contact Conditions for the Thermo-Mechanically Coupled Flow Drill Screw Process, Clemson University South Carolina, USA. (2018)
7. J. L. Milner, T. Gn├żupel-Herold, and J. D. Skovron, Residual Stresses in Flow Drill Screw driving of Aluminum Alloy Sheets,
ASME 2016 11th International Manufacturing Science and Engineering Conference Blacksburg, Virginia, USA. (2016)
[CROSSREF] 8. M. Y. Lee, S. H. Jung, and D. Y. Lee, A Study on the Effect of the Process Parameters on Joint Quality in SOP(Screwing On Plate) Flow Drill Screw Joining Process,
J. Weld. Join. 37(1) (2019) 69ŌĆō75.
https://doi.org/10.5781/JWJ.2019.37.1.9
[CROSSREF]






 PDF Links
 PubReader
 ePub Link
 Full text via DOI
 Download Citation
 Print
Print


